
If you’re social media manager and are struggling with how to organize ALL your content, this post is for you.
Content calendars might be one of the best things to happen to social media managers all over the world. They help you plan, organize, and execute marketing campaigns in an effective and organized manner. With a content calendar, you can easily track the progress of your campaigns and make sure that you are producing content that is relevant to your target audience.
Content calendars help you save time by allowing you to plan ahead and schedule posts in advance. This way, you can make sure that your content is consistent and timely while also ensuring that it is optimized for maximum reach. Furthermore, having a content calendar helps improve collaboration between team members as everyone will be aware of what needs to be done on any given day or week. Finally, it helps in measuring performance so that adjustments can be made accordingly.
Since we’re still at the beginning of 2023, it’s important to start thinking, if you haven’t started yet, about the goals you want to achieve. Whether it’s increasing your social media presence or setting objectives for a content plan, having a plan in place is essential for success.
By planning ahead and setting objectives now, you can create a roadmap that will help guide you toward achieving your desired results in 2023. This includes creating a content calendar that includes the strategies, tactics, and content you need to implement in order to reach your goals.
There are 2 types of Calendars that you will come across as a social media manager. One is the Calendar used to plan your content along with your team members and the other is to schedule your content and look back on published posts.
The first type, the planning calendar, can be created on any Calendar app, Google Calendar, or Google Sheets. I personally think Google sheets are the best option, but hey, to each their own.
Let’s get started on a few basic things you need to plan a social media content calendar.
The second type of calendar will be your scheduler tool. Tools like Crowdfire have a Calendar View for each connected platform and also a Master Calendar so that you can get an overview of all posts.
The Calendar also allows you to reschedule older posts easily.
7 things to keep in mind while planning a content calendar
1. Platform
Your choices are — Facebook, Twitter, Instagram (Personal and Professional), Pinterest, TikTok, and LinkedIn (Profiles and Pages)
Whether you’re a small business owner or you’re part of a big team, you need to understand which platforms you should publish on. This is something you have to research, analyze and decide based on your target audience and their engagement levels from previously published content.
To increase reach though, most people publish their content to all platforms. It’s very rare to lose business or audience/customers this way.
One of the reasons why people do in-depth research on what to publish to which platform is that it can sometimes be time and energy-consuming. They’d rather just publish to 2 or 3 platforms if that’s where their target audience is.
2. Title and Description
It may seem insignificant to name each post but it will make it much easier to communicate updates and changes with team members. It will lessen misunderstandings.
Giving it a description can also be helpful during various campaigns. For example, let’s say there’s a Black Friday campaign running. Each post in the campaign can be titled Black Friday 1, Black Friday 2, etc. But the description will give more clarity as to what kind of post it is or what it’s conveying. The descriptions can be specifying whether it’s a countdown post or a post to communicate that the sale is live.
3. Content-Type
The next thing to add here is the content type. When I say content type, I mean specify whether it is a generic video post, testimonial or product review, a text post, some behind-the-scenes clips, etc.
This will help you further categorize all your content ideas and streamline the planning process.
While you should regularly rotate the content types, it’s also important to understand that the engagement you get on your posts will also help you determine which specific kinds of posts are doing well and which aren’t. Pay attention to this and switch it up every once in a while.
4. Date and Time
If you know what date and time the post is supposed to be published, you should mention it here. This way if anyone from the team wants to know when a post is supposed to be scheduled, they can see it here.
This will also help other team members schedule the content they’re in charge of without clashing.
If you don’t have posts that have to go at a specific time, like a start of sale post has to go out at the start of the sale, you can always post these at the ‘Best Time’. There are many tools and apps that can calculate this for you based on when your audience is most active and previous post engagement. One of these apps that does a really good job with this feature is Crowdfire. Check it out.
5. Visuals
Visuals should include your images, gifs, videos, reels, stories, etc. This bit is so that your design team can keep up with what you need for your posts to be published at the right time. They can provide links to that specific artwork or video. This way you don’t have to scramble through a bunch of files that are named final, final.edit, or definitely.final. 😉
Adding your visuals or links to the visuals keeps things organized and also easily accessible for approvals.
6. URL
If at all you need to add links to a certain blog or video or page to your post, it’s best to include it here in the calendar. If the pricing page for your Black Friday sale is ready, go ahead and do it. It might even help others in your team look for and use it in their content plans. Like your post visuals, adding them here makes it easier to find, get approvals, and publish them.
7. Hashtags
Hashtags are extremely important nowadays for visibility and reach. Whether you absolutely need to add hashtags here depends on the purpose of your page, the variety of tags you’re going to use in the future, and whether or not you use a scheduler that offers a hashtag manager, like Crowdfire.
With a manager, you can create multiple sets of tags to automatically add to your post when composing it on the app/tool.
If not, adding it to the Calendar is still extremely helpful, organized, and easier for internal communication and approvals.
Wrapping up!
While these are a few basic but important things to add to your Calendar, you can always add or omit something based on your goals, audience, capacity, etc.
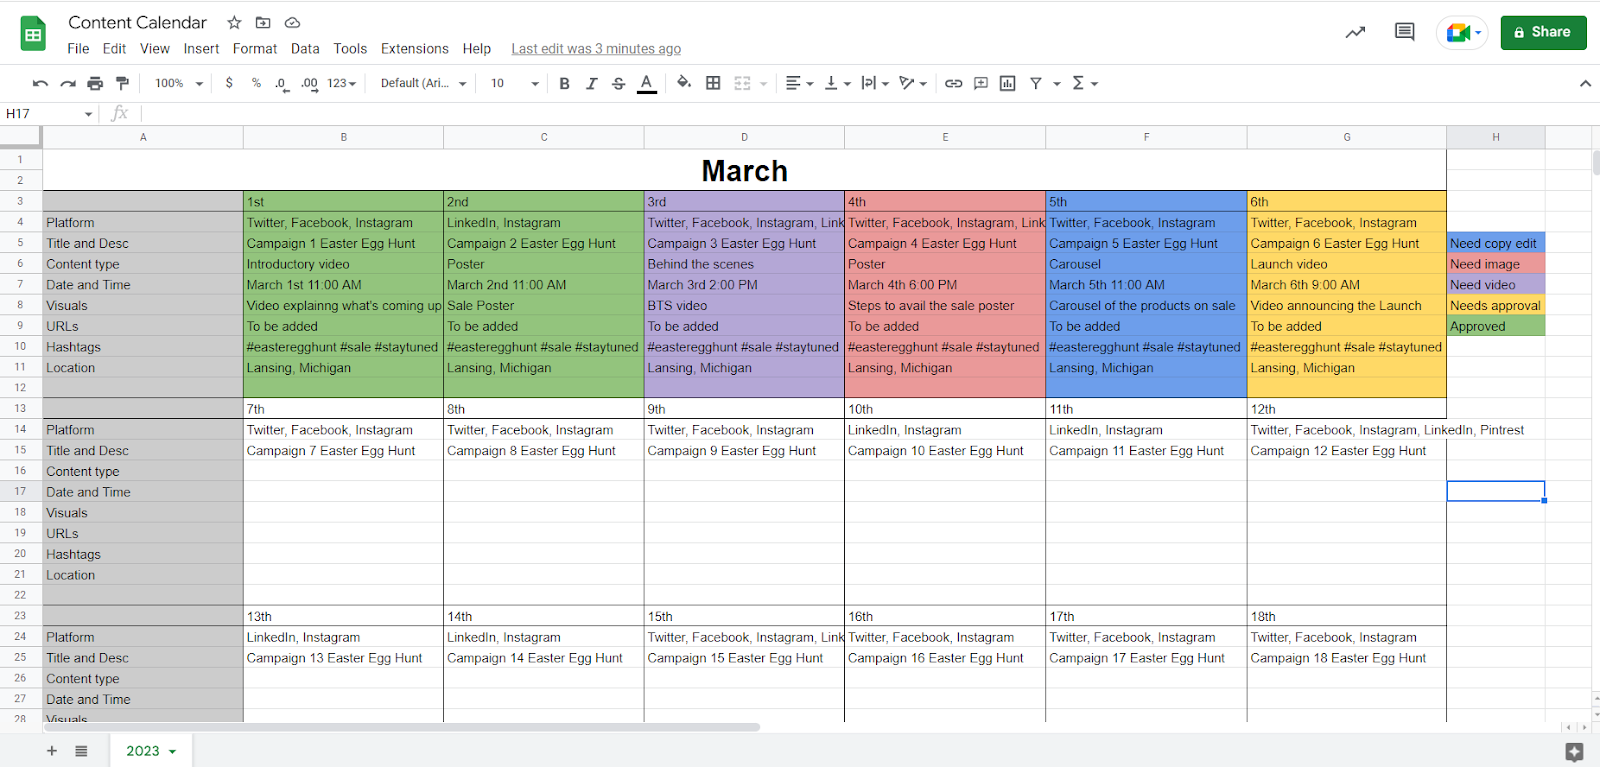
In the Google Sheet below, you can see how neat and organized things can be. You can use tabs within the sheet for each month to avoid excessive scrolling. You can also use some color coding techniques to streamline edits and approvals. Of course, using colors also makes it easier on some eyes, white can be blinding.